Wednesday, July 25, 2012

Kegging 101

I don't know about you, but when I think about kegs, I think of college frat parties, handstands, foamy beer and of course...eggs

Now that I'm a part of this homebrewing adventure...I think of CO2 tanks, ball vs. pin locks, pressure regulators and "corneys"

It'll all make sense to you in a minute too...

As much fun as it has been to bottle our own beer, and give 6 packs away for the holidays, bottling, as many homebrewers will tell you, is actually a huge pain in the ass.  Especially after you learn the glory that is kegging.

Why Keg?

According to one Beer Enthusiast at ALEiens.com (get it?!), kegging is awesome because:

1) Easier to clean/sanitize 1 keg vs. 50 bottles
2) Force carbonation allows for carbonation adjustments to your brew
3) Kegs last forever
4) Impress your friends

You only have to sanitize one big unit instead of 50 individual bottles?!  Yea...I'll do that

So what does kegging consist of?  Usually a system is made up of a keg (although let's be honest, you're going to want/need more than one...we have 3), a CO2 (carbon dioxide) gas tank, a pressure regulator and two hoses per keg. One hose feeds CO2 gas into your keg inlet, and the other hose brings the beer from the keg to your tap.

Keg sizes vary, but the most popular size is the 5 gallon Cornelius or “Corney” keg.  (Starting to come together now?)

The first step in order to keg your homebrew is to pressurize and sterilize the keg.  You need to make sure there are no leaks and you will be able to achieve an air tight seal. 


Then, fill the keg by siphoning in your homebrew.  Once full, put the top on it and pressurize the keg using your CO2 tank.  Purge any remaining air in the keg and displace it with CO2.  


In order to do this, add CO2 to the keg, then release air using the release valve on top.  Repeat this 4-6 times to make sure that all of the air is out and replaced by CO2 (thank you to our friends and forum posters at Beer Smith for help with this explanation)

To determine the amount of CO2 needed for your beer, we use our good ol' friend math (OR this handy dandy (no really...it's called that) Carbonation Chart) Carbonation levels vary by beer but you'll need the refrigerator temperature and volume of beer to determine the level used.  Set your CO2 tank regulator to the desired pressure, hook it to your keg and place the keg in the refrigerator.  It is better to start with a lower carbonation and tweak your beer up to a higher one if desired, rather than the other way around.

For storage/chilling, we bought a chest freezer from Costco that will eventually be fitted with a collar and taps...but one step at a time.

This:


Will eventually look something like this:


The important thing to remember when it comes to kegging beer is to make sure you are leak free and that everything is sanitized.   

The best part about kegging (other than offering your friends beer from it)?  Kegged beer will begin to carbonate in a day or two and reach full carbonation within a week!  That's at least 2 weeks shorter than bottling!!

#winning


 The beer is tasty, maintains a nice foamy head, and is just overall awesome!  I'm a convert!


Tuesday, June 26, 2012

Literal Lava Flow?

Does anyone else talk to their beer like it's a family member?


So brewed our Kona Firerock Clone on a Sunday (which we are lovingly referring to as "Lava Flow")

D came home Monday night to a mess

A yeasty, foamy mess

Remind you of anyone?

It seems our latest creation has taken to the name "Lava Flow" a bit too literally.

So because we didn't want to clean up after the beer every hour on the hour for the next few days, D doctored us up a blow-off tube!


But just to give you an idea HOW active this yeast has been here is a quick video:


Please note, I am not doing anything here!  This is the act of the yeast turning the fermentable sugars into alcohol and releasing air through the tube, which in our case here, is submerged in a pot of sanitized water to keep it from going everywhere.

Remember how we purposely put this latest batch in the glass carboy so we could see what's going on?  Turns out we got quite a show!

See kids?  Chemistry can be fun! and delicious...and messy...

All Grain All The Way

Hi friends,

This weekend we hit a major milestone as brewers...we completed our first all grain batch!

We ordered the ingredients a little while ago, and it was finally time to tackle the 10-pound-grain-wonder

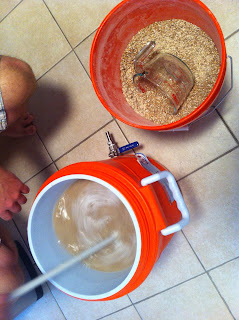
The process is almost the same, but differs in that we finally got to use those honking orange sports drink coolers!  Remember us?

So first, we gave the grain mill a bit of a workout by crushing all 10+ pounds of grain


GRR!

While we were doing that, we brought a few gallons of water to a temperature of about 160 degrees to get to a mash temperature of about 154 (the grains are cooler than the water, so when we add the grains, our temperature will go down).  This is a "single temperature infusion" (a/k/a the idiot-proof mash schedule - add water and leave it alone).  Mash schedules can get infinitely more complex, and we'll probably end up with a whole lot more complexity in future batches, but for this one, we wanted to KISS it as much as possible.

Once the water hit our "strike" temperature of about 163, we filled one of those coolers about 3/4 of the way with the hot water.

Commence the Mash!


We looked at our heaping pile of crushed grains, and we looked at the 3/4 of the way filled cooler/mash tun, scratching our heads and wondering/praying if it was going to all fit.


Slowly we added the crushed grains to the hot water, gradually making, for lack of a better description, a giant bowl of oatmeal.  Constantly stirring and praying...


 Stirring and praying... 

I have a sudden craving for oatmeal...
Thankfully it all fit! (huzzah!)

We put the lid on and let it sit and steep for one hour.  We ended up pretty close to our initial mash temperature - the mash started about 153, and ended up about 149 by the end of the hour.  Next time we'll heat our strike water a little higher (maybe closer to 170), as we have a better idea about how much heat we'll loose in the mash.


While the mash was resting, we heated up more water for the next step, the sparge.  This water is used to sparge, or "rinse," the sugars from the grains.  We heated this to about 190 degrees or so, because we wanted our sparge water to be about 170-180 when it hit the grain bed.

Why the different temperatures between the mash water and the sparge water?  Good question.  The answer has a lot to do with beer chemistry, and we don't really understand it all that well.  However, we think the answer is that lower temperatures mean more fermentable sugars (sugars the yeast can eat), which means more potential alcohol (do I have your attention now?).  Higher temperatures mean more unfermentable sugars (sugars the yeast cannot eat), but unfermentable sugars help contribute to the "mouthfeel" of the beer (how the beer feels in your mouth - i.e., is the beer watery or more full bodied).

So basically we wanted to strike a balance between having a decent amount of alcohol (so the beer's not overly sweet) and having a solid mouthfeel (so the beer's not too watery).  But I digress... 
Sparge Time

Once the mash rest ended, we began to sparge.  Our first step in the sparge is called the vorlauf (funny German word that means to clarify by recirculating).  This is done before adding any of the sparge water to the grains.  To begin the vorlauf, we opened up the valve on our mash tun and let the wort run into a pitcher.  At first the wort liquid had a lot of grain husks in it, which we do not want to end up in our boil kettle.  That's why we do the vorlauf (Gesundheit) 

We drained off about half a pitcher, and poured the contents back over the grain bed.  We did this three or four times until the liquid started running free of grain husks. 


Then, we drained off the grain-free wort, putting it into our boil kettle. 

Our sweet set up
 For you beer geeks out there (like us!), this is called the "first runnings."  There's a whole lot of history about first runnings, which you can read if you want.  Go ahead.  We'll wait...

And we're back. 

Once the cooler-filled-grain-bed was pretty free of liquid, we added the sparge water.  We did this by filling the cooler almost all the way back up to the top and restirred the grains.  The idea here is to get all of the sugars we created during the hour-long mash into the liquid in the boil.  Why? Because sugar is what yeast eat to make alcohol, and alcohol-free beer is not all that much fun to drink (or make, for that matter).  So, the more sugar we get out of the grains, the more food the yeast have to eat, and the more potential booze we can make.  Genius formula if you ask me.

The process of adding the water in big amounts like this is called "batch sparging."  There are other forms of sparging (i.e., fly sparging), but those can be a bit more complex and require some different equipment.  As much as D loves buying new beer toys, we want to get a few all grain batches under our belt before trying out new sparge methods.

 After letting the sparge water sit for a few minutes in the grains, we vorlaufed (bless you) again, then drained these "second runnings" into the boil kettle, mixing them with the "first runnings."  We continued this pattern of sparging, vorlaufing, and draining into the boil kettle until we hit our boil volume of a little more than 5.25 gallons.

Filling up the boil kettle
Once we had our boil volume, we took our first gravity reading (which measures the amount of sugars in the liquid), and put the pot to the flame (or in our case, glass stove top).
Hop To It

Once the boil started, we proceeded to throw in the hops.  This particular recipe had an active hop schedule.  There were different hops that needed to be added all throughout various times throughout the boil.  In a few weeks, we'll add additional hops for flavor and aroma in a "dry hopping" phase for this brew.  In total, the beer boiled for about an hour, with hops being added at the 40, 30, 20, 10 and 5 minute mark.

The rest of the process was the same, cool down the mixture with the wort chiller, add the yeast, sanitize everything in sight, and let condition! 

Immersion Chiller in Action

 In the interest of full disclosure, a few things to point out:

1) To satisfy our voyeuristic curiosity, we decided that instead of putting this beer in a plastic bucket, we wanted to watch the magic happen, so we put in a glass carboy.

2) Also, we forgot to use a yeast starter this time around since the decision to brew was a bit last minute (a/k/a, "We have a free Sunday for once in our lives, we should probably brew so we can stop looking at that 10 lbs bag of grain on top of the fridge"...or something like that)

Since this particular recipe will result  in a high alcohol by volume beer (darn?), it will be hanging out in the carboy for a few weeks.


Friday, June 15, 2012

(savor)

Hiya,

I promise the only reason I am delayed in writing this post is because I have actually been busy at work for once, and NOT nursing a 5 day long hangover from what might be the greatest beer event ever...

For those of you who don't know, Savor is a food and beer event that takes place here in the district at the National Building Museum.  It's a fantastic space...basically a huge room filled with the aromas of hops and food and beer and cheese and amazingness (and as you can see below, people)!


Savor is supported by the Brewers Association.  Over 75 brewers attended, pairing their creations with appetizer options.  It was a food and beer lovers heaven.  My favorite way I heard someone trying to explain savor was by calling it "the beer prom"

There was also the option to sit in on smaller beer "seminars" called salons.  There, you could meet with the brewers in a more intimate setting.  In other words, here is where you really got to geek out!  We attended the "Fade to Black" salon, which was described as:

Fade to Black: The Effect Dark Color has on Food and Beverage

In this wide ranging discussion, John Mallet of Bell’s Brewery speaks on the substantial effect that browning reactions have on beer and foods. Participants will experience how these classes of fundamental flavors interact to develop complementary harmonies in synergistic pairings. An assortment of beers from Bell’s Brewery will be paired with a variety of food items to highlight applied Maillard reactions.

We were able to ask questions, gain insight to the creative process and of course, sample more beer!  Here was our tasting:


We got to sample many things we've never even heard of, including the parting gift, which was a bottle of Terra Incognita, a collaboration between Sierra Nevada Brewing and Boulevard Brewing.

The beer was decribed as, "a dark ale. Maltier than an amber but not quite a stout. They brewed it with Estate malts out of Chico and wheat, the latter as “an homage to the longtime staple crop of the Midwest.” The beer then traveled to Kansas City. Boulevard brewed another component, blended the two beers, dry-hopped it with East Kent Goldings and are now aging it in Missouri oak barrels that previously held wine and spirits. The beer will soon go into 750s where it will be bottle-conditioned with Brettanomyces." (from Beerpulse.com)

I describe it as darn tasty! (we broke into a bottle last night)


As you can see here, there were wayyyyy too many breweries to comment on all of them, all I can say is, if you ever have the chance to go, definitely do your best to grab a ticket...and thank you very, very much to the American Homebrewers Association for allowing the possibility of purchasing tickets in advance!


Wednesday, June 6, 2012

The Latest and Greatest (and perhaps even Nastiest?!)


Hola,

Here's the latest in Condo Beer News:

1) The Octane IPA came out JUST ok.  Not our best effort, but as explained 2 posts ago, the temperature in the condo was a little on the high side when the beer was initially conditioning.  It's not bad, its just not an IPA

2) The English Bitter (aka "Naughty Zoot") was given a label...


...and it came out pretty tasty!  It's a refreshing, light beer (or breakfast beer, or porch sippin' beer) that will be perfect in the DC humidity.

[We have about 5 cases of bottled beer in the condo at the moment, and it's truly and beautiful sight!]

3) A few nights ago, we brewed the latest homebrew kit we received and that was a honey wheat beer.  We decided not to rack this beer to secondary for a few reasons:

a) Fellow homebrewers feel this step is really unnecessary.  It only proves useful in instances of making high alcohol-by-volume beers or if you are going to do some sort of dry hopping (which I am a huge fan of, particularly Schlafly's Dry Hopped APA)
b) It's a pain in the arse
c) It's a wheat beer...its supposed to be a little on the cloudy side!

So, we skipped this step this time around

The beer is currently in bottles doing its thang.  We decided to take the pop-culture route and call it "Honey Badger Honey Wheat" (thanks to our friend JR for helping with the design!):


He don't give a $h*t

If you have no idea what I am talking about, click HERE immediately...then be sure to come right on back

And if you ARE familiar wit the nasty a$$ honey badger, I'd probably watch it again anyway

It's cool, I'll wait

4) The heat stick (remember this?)...


...proved to be most successful!  No one died (huzzah!) and we cut our brewing time by about 2 hours (oh the woes of brewing on an electric stove in a condo).  We tried it out on the honey wheat beer, and plan on using it again to finally do our first all grain batch.

5) Finally, our next progressive milestone will be entering into the world of kegging (dun dun dun...)

Tuesday, June 5, 2012

DC Beer

Hi there,

Ok, ok...I'm really sorry

I've been bad with the updates lately

And I don't have any surgery/foot/prescription drug related excuses this time

I just dropped the ball

Let me make it up to you!


We recently became involved in some of the DC Homebrewers association activities.  We went to our first event a few weeks ago at Smith Commons where they did an all grain brew demonstration on the premises.  We learned a lot getting ready to go into our first all grain batch (see previous post...we will be brewing up a Fire Rock Clone).  Everyone was really awesome and just plain loves beer.  My kinda crowd.

We were able to pick everyone's brain and ask the important questions such as:

"Do you hate bottling as much as we do?",
"Do you prefer leaf or pellet hops?"
"What are the pros and cons of secondary conditioning?" and,
"Are you a ball lock or pin lock person" (apparently this means something in beer speak)

This information will be imperative when it comes to our transition into both all-grain brewing, but kegging as well (which is something we are very close to doing).

This past weekend we visited a few of the local breweries.  One up and comer is the 3 Stars Brewing Company.  Located in the Tacoma area, they are not only a local brewery, but they are the district's FIRST AND ONLY homebrew shop!  No more need to schlep out to the burbs for all your brewing needs!  (there was much rejoicing)

The guys there are doing some amazing work.  The space is awesome and the staff is extremely passionate and knowledgeable.  I cannot wait to try their beer.  I have a feeling its going to be huge in the district.  Best of luck to you guys!

In sticking with the DC beer theme, we decided to take a drive over to DC Brau.  There, we got to sample all of their latest offerings, got some beer swag, and of course, took home a growler full of the good stuff.  We were particularly fond of their "Brainless Corruption", which was a belgian style pale ale and just the perfect way to spend a Saturday afternoon.

This weekend, we will be tweeting to you from SAVOR! (Follow us at @brewmeacoldone ... you know you wanna!)  SAVOR week here in the district is full of fun beer-related events.  If you are in the area, I would highly check out the list of events for the remainder of the week here.  For us, the main event is Saturday...which for me is basically an excuse to ignore doctor's orders, put on some heels, and drink a ton of craft brew =)

Our latest beer progress, kegging 101 and SAVOR posts coming soon


Monday, April 30, 2012

Update

Hello Everyone,

It has been awhile since I've posted.  I had foot surgery recently and let's just say blogging on prescription meds isn't good for anyone involved...

But now that I'm back on my feet (sort of), I wanted to give you the update of what's been going on in the condo.

Our Excelsior Altbier has calmed down a bit.  After being patient (which is hard) and letting the beer sit undisturbed in the bottles for a little while, opening them now results in a dryer kitchen counter

#winning

We have also since brewed an IPA (Ok, he brewed while I sat on the couch with my leg propped up and watched).  We are calling it our"Octane IPA" after the kit it came in.  It was conditioned with oak chips and is currently conditioning in bottles.  It's a little on the sweeter side thus far, because it conditioned in a condo that was kept at a probably too warm 78 degrees (apparently recovering from foot surgery resulted in me having no blood circulating in any other extremities, therefore I was feeling especially chilly for the few days the beer was sitting in the carboy.)   
I think our Octane IPA, despite its perhaps unusual sweet and citrus notes, is going to be good, especially for someone like me who tends not to love IPAs (There, I said it!...please keep the hate comments to a minimum!)

[Side note: I do have a great fondness for one particular IPA and that's Flying Dog Wildeman, which I could drink all day (and on occasion have...don't judge)]

Also conditioning is an English Bitter, which despite the name, is not actually bitter tasting (which was good news for me, see previous paragraph).  Turns out that across the pond, that "bitter" is just another way of saying "pale ale".  That is sitting in a carboy (at a much cooler condo temperature) and awaits bottling. 

Since we both possess an affinity for all things "Monty Python" (and since surgery has inducted me as a member of the Ministry of Silly Walks), we are going to call it "Naughty Zoot".  Label to come...

Finally, and perhaps the biggest news we have, is that we have decided to step it up and move to our first ALL GRAIN batch.  Fellow home-brewers understand this is a big step and we are taking a lot of necessary pre-steps.  A false bottle for one of the giant orange coolers has been purchased and installed.


Also, all of our previous nozzles have been replaced with stainless steel ones.  So we've gone from this:


To this:


(oooh shiny!)

Finally, and perhaps most importantly, we've decided WHAT we are going to brew.  The ingredients have been ordered and we will be toying with a Kona Fire Rock clone recipe.  We will be affectionately referring to it as "Lava Flow" because while we were vacationing in Hawaii, anything you ordered that had "Lava Flow" in the name was automatically delicious.


The last update I have for you involves the latest in our condo-beer beer tinkering.  As you can imagine, condo-brewing has it's own unique challenges, such as, no access to an outdoor space, especially a hose, leading one to resort to a converted bathroom sink and plastic tubing (and if you don't watch that sucker, it COULD result in water...e.v.e.r.y.w.h.e.r.e....)

OR the extremely fun challenge of trying to heat 5 gallons of water on an electric stove and after 45 mins JUST getting to your initial steep temperature while simultaneously praying that your electric bill gets lost in the mail this month, and you can't help by cry out..."there has to be a better way"

Well my friends, we might just have it.

Since we have some time to kill before our ingredients arrive, we are going to make an electric heat stick.  This is an electric stick (duh) with a water heating element on the end of it.  It's basically a hot, plug in, magic wand.  Our specs are going to be modeled after this design:


We liked this one because it can hook over the pot and be left alone.  My philosophy here is that the less we have to fuss with this thing, probably the better.  It should cut our boiling time in more than 1/2, which is good because summer is coming and spending 6+ hours waiting for a pot to boil doesn't make for the best tan.